TOC
思考
- 图形透明区域算法计算出图形边界。
- 创建多个Container来存放多次绘制的图形数据最后通过计算Container的边界来计算绘制图形的边界。
- 检测绘制图形的边界是否临近某一元素,临近则加入临近元素的Container,否则新建一个Container并加入绘制元素。
- 图形顶点计算:
- 定义两个数组A、B,循环XY坐标,每次延X轴方向遇到的第一个点使用
unshift推入数组A,后续其它点使用push推入数组B,依次循环到最后一个点,然后合并数组AB即可得到所有顶点 - 定义两个数组A,循环XY坐标,每次延X轴方向遇到的第一个点使用
unshift推入数组A,后续其它点使用push推入数组A,依次循环到最后一个点,然后合并数组AB即可得到所有顶点,最后一个点即为开始点和结束点 - 注意:顶点计算规则为,当获取到一个点后,判断当前点的周围8个方向的点是否存在当前图形范围内,部分点存在则表示该点为边上的点,然后再移除这部分点中的有且只有一个同一方向存在两个的临近点的点,即为图形全部顶点坐标。
- 定义两个数组A、B,循环XY坐标,每次延X轴方向遇到的第一个点使用
PS: 再多的思考还是不如一个好用的工具,在死去活来的折腾了好几天后,终于在万能的AI引导下,找到了clipper-lib这个非常好用的图形计算工具库。算法是事,还是交给专业大佬们研究吧,还是做好工具的使用者就OK啦。
Tip
更多示例请查询:https://jsclipper.sourceforge.net/6.4.2.2/index.html
基本配置
首先,准备一个HTML文件clipper.html,然后复制下面内容到文件中。在文件中引入了clipper-lib这个多边形工具库。
<html>
  <head>
    <title>Javascript Clipper Library / Boolean operations / SVG example</title>
    <script src="https://cdn.jsdelivr.net/npm/clipper-lib@6.4.2/clipper.min.js"></script>
    <script src="./clipper.js"></script>
  </head>
  <body>
    <h2>Javascript Clipper Library / Boolean operations / SVG example</h2>
    <p>This page shows an example of boolean operations on polygons and drawing them using SVG.</p>

    <div style="display: flex; gap: 10px;">
      <div id="union">
        <div>并集(Union)</div>
      </div>
      <div id="difference">
        <div>差集(Difference)</div>
      </div>
      <div id="xor">
        <div>异或(Xor)</div>
      </div>
      <div id="intersection">
        <div>交集(Intersection)</div>
      </div>
    </div>
  </body>
</html>
然后创建JS文件 clipper.js,并定义一组要进行计算的路径顶点坐标。
// 路径顶点坐标
const subjPaths = [
  [{ X: 10, Y: 10 }, { X: 110, Y: 10 }, { X: 110, Y: 110 }, { X: 10, Y: 110 }],
  [{ X: 20, Y: 20 }, { X: 20, Y: 100 }, { X: 100, Y: 100 }, { X: 100, Y: 20 }],
];
const clipPaths = [
  [{ X: 50, Y: 50 }, { X: 150, Y: 50 }, { X: 150, Y: 150 }, { X: 50, Y: 150 }],
  [{ X: 60, Y: 60 }, { X: 60, Y: 140 }, { X: 140, Y: 140 }, { X: 140, Y: 60 }],
];
配置缩放系数,然后将路径的每个坐标乘以缩放系数,并使用 Math.round() 四舍五入为最接近的整数。
Tip
取整在
ClipperLib.JS.ScaleUpPaths函数内自动完成,当然若无缩放的需求出可省略这一步骤,在后面步骤中同时将缩放系数相关配置删除。
...
// 缩放比例
const scale = 100;

ClipperLib.JS.ScaleUpPaths(subjPaths, scale);
ClipperLib.JS.ScaleUpPaths(clipPaths, scale);接下来实例化一个Clipper的对象,并将要计算的路径顶点坐标分别按目标对象与裁剪对象的方式加入到实例的Path中,同时定义多边形填充规则为非零方式。
...

// 实例化Clipper对象
const cpr = new ClipperLib.Clipper();
cpr.AddPaths(subjPaths, ClipperLib.PolyType.ptSubject, true);
cpr.AddPaths(clipPaths, ClipperLib.PolyType.ptClip, true);

// 配置填充规则
const subjFillType = ClipperLib.PolyFillType.pftNonZero;
const clipFillType = ClipperLib.PolyFillType.pftNonZero;
到此步,我们已经完成多边形计算的基本配置,接下来将对多边形进行实际的运行操作,即:交集、并集、差集、异或。
裁剪
首先,定义一个方法draw(),该方法带有一个参数clipType表示为如果进行路径计算,即:交集、并集、差集、异或,同时在浏览器控制台输出结果。
function draw(clipType) {
  const solutionPaths = new ClipperLib.Paths();

  cpr.Execute(clipType, solutionPaths, subjFillType, clipFillType);
  console.log(JSON.stringify(solutionPaths));
}然后在window.onload方法中分别计算交集、并集、差集、异或四种操作的结果。
window.onload = () => {
  // 并集
  draw(ClipperLib.ClipType.ctUnion);
  // 差集
  draw(ClipperLib.ClipType.ctDifference);
  // 异或
  draw(ClipperLib.ClipType.ctXor);
  // 交集
  draw(ClipperLib.ClipType.ctIntersection);
};
此时,在浏览器控制台就能看到路径计算的结果啦~
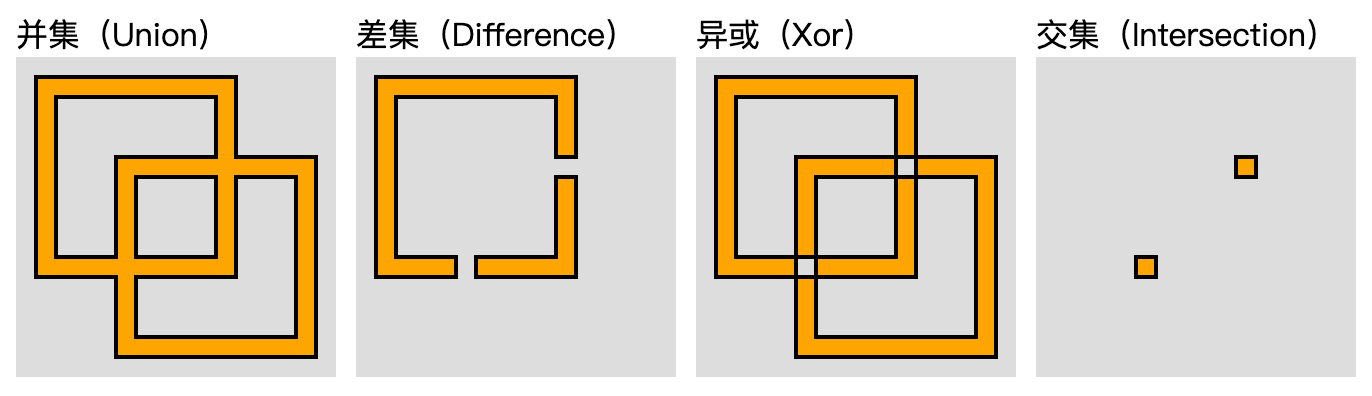
什么,全是字符,表现不够直观!!!这里,我们可以使用SVG的方式渲染出计算结果,这样就可以更为直观的表现出计算的结果,看出它们间的差异。接下来看看如何实现的吧!
SVG
首先,定义一个方法paths2string,该方法带有两个参数分别为paths(需要转换的路径顶点坐标)和scale(缩放系数,默认值为1)。
// Converts Paths to SVG path string and scales down the coordinates
function paths2string(paths, scale = 1) {
  let svgPath = '';

  for (let i = 0; i < paths.length; i += 1) {
    for (let j = 0; j < paths[i].length; j += 1) {
      if (!j) svgPath += 'M';
      else svgPath += 'L';
      svgPath += paths[i][j].X / scale + ', ' + paths[i][j].Y / scale;
    }
    svgPath += 'Z';
  }
  if (svgPath == '') svgPath = 'M0,0';
  return svgPath;
}然后,在draw()方法中,添加SVG的配置代码,并输出到HTML中。
- function draw(clipType) {
+ function draw(clipType, elem) {
  const solutionPaths = new ClipperLib.Paths();

  cpr.Execute(clipType, solutionPaths, subjFillType, clipFillType);
  console.log(JSON.stringify(solutionPaths));

+  const svg = `<svg style="background-color:#dddddd" width="160" height="160">
+  <path stroke="black" fill="orange" stroke-width="2" d="${paths2string(solutionPaths, scale)}"/>
+  </svg>`;

+  elem.innerHTML += svg;
}由于,在刚开始时,我们已经在HTML文件中配置好相对应的展示区域,因此我们再调整一下window.onload方法里面的代码即可,如下
window.onload = () => {
  // 并集
-  draw(ClipperLib.ClipType.ctUnion);
+  draw(ClipperLib.ClipType.ctUnion, document.getElementById('union'));
  // 差集
-  draw(ClipperLib.ClipType.ctDifference);
+  draw(ClipperLib.ClipType.ctDifference, document.getElementById('difference'));
  // 异或
-  draw(ClipperLib.ClipType.ctXor);
+  draw(ClipperLib.ClipType.ctXor, document.getElementById('xor'));
  // 交集
-  draw(ClipperLib.ClipType.ctIntersection);
+  draw(ClipperLib.ClipType.ctIntersection, document.getElementById('intersection'));
};
此时,在页面上就能看到最终计算的多边形效果唞~~~完美!
扩展
面积计算
要获取多边形的面积 Clipper库提供了AreaOfPolygon()和AreaOfPolygons()方法,分别计算单个和多个多边形面积。
// 计算单个多边形面积
const area = ClipperLib.JS.AreaOfPolygon(polygon);

// 计算多个多边形面积
const area = ClipperLib.JS.AreaOfPolygons(polygons);
计算多边形的周长
为了获取多边形的周长,Clipper库提供PerimeterOfPath()和PerimeterOfPaths()两个方法,分别计算单个和多个多边形周长。
// 单个多边形周长
const polygonal_perimeter = ClipperLib.JS.PerimeterOfPath(path, true, 1);
// 多个多边形周长
const polygonal_perimeter = ClipperLib.JS.PerimeterOfPaths(paths, true, 1);
上面的两个示例计算了多边形的周长,这意味着该周长是从第一个点到第一个点进行测量的,而不管最后一个点是否与第一个点相同。
如果要测量线的周长,只需将上面两个方法的第二个参数改为false即可。
// 单个线的周长
const line_perimeter = ClipperLib.JS.PerimeterOfPath(path, false, 1);
// 多个线的周长
const line_perimeter = ClipperLib.JS.PerimeterOfPaths(paths, false, 1);
完整代码
clipper.html
<html>
  <head>
    <title>Javascript Clipper Library / Boolean operations / SVG example</title>
    <script src="https://cdn.jsdelivr.net/npm/clipper-lib@6.4.2/clipper.min.js"></script>
    <script src="./clipper.js"></script>
  </head>
  <body>
    <h2>Javascript Clipper Library / Boolean operations / SVG example</h2>
    <p>This page shows an example of boolean operations on polygons and drawing them using SVG.</p>

    <div style="display: flex; gap: 10px;">
      <div id="union">
        <div>并集(Union)</div>
      </div>
      <div id="difference">
        <div>差集(Difference)</div>
      </div>
      <div id="xor">
        <div>异或(Xor)</div>
      </div>
      <div id="intersection">
        <div>交集(Intersection)</div>
      </div>
    </div>
  </body>
</html>
clipper.js
const subjPaths = [
  [{ X: 10, Y: 10 }, { X: 110, Y: 10 }, { X: 110, Y: 110 }, { X: 10, Y: 110 }],
  [{ X: 20, Y: 20 }, { X: 20, Y: 100 }, { X: 100, Y: 100 }, { X: 100, Y: 20 }],
];
const clipPaths = [
  [{ X: 50, Y: 50 }, { X: 150, Y: 50 }, { X: 150, Y: 150 }, { X: 50, Y: 150 }],
  [{ X: 60, Y: 60 }, { X: 60, Y: 140 }, { X: 140, Y: 140 }, { X: 140, Y: 60 }],
];

const scale = 100;

ClipperLib.JS.ScaleUpPaths(subjPaths, scale);
ClipperLib.JS.ScaleUpPaths(clipPaths, scale);

const cpr = new ClipperLib.Clipper();
cpr.AddPaths(subjPaths, ClipperLib.PolyType.ptSubject, true);
cpr.AddPaths(clipPaths, ClipperLib.PolyType.ptClip, true);

const subjFillType = ClipperLib.PolyFillType.pftNonZero;
const clipFillType = ClipperLib.PolyFillType.pftNonZero;

function draw(clipType, elem) {
  const solutionPaths = new ClipperLib.Paths();

  cpr.Execute(clipType, solutionPaths, subjFillType, clipFillType);
  console.log(JSON.stringify(solutionPaths));

  const svg = `<svg style="background-color:#dddddd" width="160" height="160">
  <path stroke="black" fill="orange" stroke-width="2" d="${paths2string(solutionPaths, scale)}"/>
  </svg>`;

  elem.innerHTML += svg;
}

// Converts Paths to SVG path string
// and scales down the coordinates
function paths2string(paths, scale = 1) {
  let svgPath = '';

  for (let i = 0; i < paths.length; i += 1) {
    for (let j = 0; j < paths[i].length; j += 1) {
      if (!j) svgPath += 'M';
      else svgPath += 'L';
      svgPath += paths[i][j].X / scale + ', ' + paths[i][j].Y / scale;
    }
    svgPath += 'Z';
  }
  if (svgPath == '') svgPath = 'M0,0';
  return svgPath;
}

window.onload = () => {
  draw(ClipperLib.ClipType.ctUnion, document.getElementById('union'));

  draw(ClipperLib.ClipType.ctDifference, document.getElementById('difference'));

  draw(ClipperLib.ClipType.ctXor, document.getElementById('xor'));

  draw(ClipperLib.ClipType.ctIntersection, document.getElementById('intersection'));
};
参考